Friday, September 19, 2014

It's about time!

Finally its here!

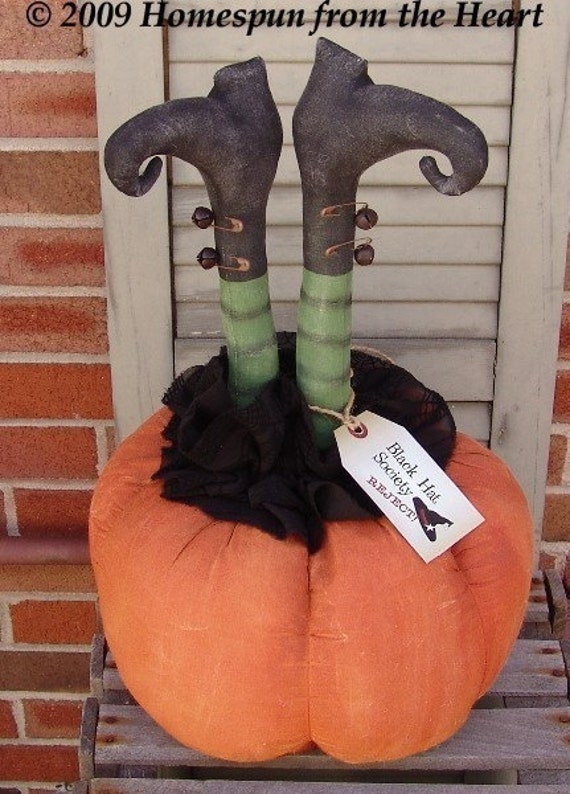
Time for a craft night. Halloween is one of my favorite holidays to decorate and craft for so there is NO WAY I was going to let another Halloween pass by without getting together and crafting. I absolutely love witches and when I came across this adorable pattern by Cindy Markovcy, I had to have it! She has a bunch of great patterns here: www.etsy.com/shop/cindyshomespun

Black Hat Society Reject Witch
 
 
Primitive Halloween Doll Black Hat Society Reject Witch e pattern

This will be the item we will be making. The cost will be $25. The majority of the sewing will be done for you. All you need to do is paint, socialize, assemble doll--"witch" might require a little hand stitching, nothing you can't handle, and enjoy the night! (pattern and step by step instructions are included.

Come join us!

October 3, 2014
6:00-9:00p.m.

please RSVP to brandee@thoughtsthatstick.com by the end of the day September 29, 2014. I will e-mail you the exact location when you RSVP. (It is in the city of South Salt Lake)

Sunday, September 7, 2014

Little Ittles

Ok so I have told you that I would post what I have been working on since I no longer have my wood work shop. (oh I miss my garage) I switched to indoor crafting and the one that takes the most of my time, is sewing. I've never taken any other classes besides Home Ec. in Jr High School--thanks Mrs. Mock. Needless to say it has been a fun adventure learning as I go and coming up with my own techniques--which I'm sure there are real names for and probably faster ways to do them! I love to create things and experiment with new ideas. Here is a little history that got me started.

 I am a mother of 4 with baby #5 on the way!
One day my husband was feeding lunch to our little girl, we had 2 boys previously, and he noticed her bib was "boyish". (By the 3rd baby, you kinda just use what's available!) Well, he decided she needed a more "girlie" bib, which is when he got an idea. He thought it would be adorable to have her precious face be the center of a flower. He spoke with me later that night about his idea and asked if I could make it. We then brainstormed and got a few different ideas. I had the "ok" to spend as much money as I needed to get going and get the designs perfect. This was not hard for me because I love to buy fabric and crafty stuff, and create things...I began to wonder if he would regret the "ok" he gave me! My mind was going a million miles an hour, I could not keep up! I got right to work. It took some time to get the designs to look the way I imagined (I have a hard time making the idea that's in my head, come to life) I got discouraged many times, but was inspired more, so I pressed on. I soon made my first bib. It was a sunflower bib. It was exactly what I wanted...except I made it with scrap fabrics so my adorable little girl was still wearing a "not-so-girlie" bib! (Or at least not-so-cute)

Creating this first bib gave me the drive to continue on. Since, I have been designing and creating these unique, adorable bibs. As of now, we have 15 different designs created and many more waiting to be brought to life.

I now have 4 children and another on the way. I always reach for these bibs over any others because I love the look, the functionality, the style, and mostly that my baby keeps her clothes clean!

All bibs are made with 100% cotton and backed with absorbent terry cloth. They are sewn with coordinating thread and top stitched for durability and style. All are secured with a heavy duty snap, so little hands don't pull them off!


These are the original styles I came up with. I since have come up with many more. Next I made some elephants, monkeys, and cupcakes.


This year I came up with my Independence collection. The 4th of July is one of my favorite holidays and so I really enjoyed working on these! All are bibs unless noted underneath.

blanket


Burp cloth


Wash cloths


Currently I am working on my Halloween collection. Halloween is another of my favorite holidays so I am loving creating these too! I am also working on a Halloween craft for craft night! Yep I'm going to have one again soon! (Unless this baby has other plans!) So check back soon for the craft night craft!

Oh I forgot to list the name of our company for our
 one-of-a-kind designer baby bibs!

www.littleittles.com

and my Etsy shop:

www.etsy.com/shop/littleittles

stop by and check them out!

Sunday, July 20, 2014

Hello Kitty Summer Dress

I mentioned in my last post that I have turned my crafting interest indoors (due to my wood work shop not existing anymore) I have picked up sewing. I recently got a new sewing machine that I am still working on figuring out all the great features it has. I still haven't shown you what I've been working on for the past few years, but here is a quick summer dress I made in 30 minutes for my little girl!

So this week I went to the fabric store to get a few needed things and of course I saw this Hello Kitty fabric and HAD to get it for my little girl! Right now she adores this little kitty. She was so happy when I showed her the fabric and told her what I was going to make for her. She asked if she could wear it right away. I explained that I needed to sew it first and then she could wear it. Instantly, there was nothing more important than for me to get us home and start sewing! I only got 1 picture because that was as long as I could get her to hold still for me. So here it is, the finished project:
This only took me about 30 minutes and I actually made 2! (One for her little sister too)

The fabric itself has several bands of elastic and gathered fabric at the top. I measured each girl's chest and cut the fabric 1 inch longer to allow for the seam. I sewed each dress together using a 1/2 inch seam. I double checked the top part where the elastic and gathered fabric is to ensure that the elastic was sewn into the seam (to make sure it wouldn't unravel with wear).

I then was going to use my pinking shears on the seam, but remembered that my new sewing machine had special stitches to help fabric not fray. (I did not have enough energy or patience to get my surger out for such a simple job, that probably didn't even need it) I used an overcasting stitch to reinforce the edge of the fabric. I have never used this stitch before so I do not know how it will turn out, but that's the fun of it! Learning new things as we experiment along the way! (I don't think the overcasting stitch was required, but I just did it to see how it holds up and performs. So if you don't have a surger or machine that can do overcasting stitches, this project is still doable for you)

Next, I had the girls try their dress on (inside out) so I could measure the length of straps and pin them into place. I made the straps out of basic black ribbon. (I wanted to make this project as simple as I could...maybe that way I could for sure get it done) If you're like me, I have several projects going at one time and sometimes it takes a while to get them done! Anyway, once in place, I carefully took them off my girls and sewed them into place. I then trimmed up the extra threads and was finished. She was so excited to put it on, I could barely get it on her straight!

She loves this simple, comfortable dress. Once something gets on it she asks if I can wash it right away so she can wear it again. Oh, this is what makes a project worthwhile...the excitement and happiness it brings to others! Happy sewing!!

Sunday, July 6, 2014

So it's been a LONG while!


Hello everyone....if anyone is still there! I feel so bad that I have not been crafting. No excuses here, but in case you want to know here's why:

We did major construction on our house...we actually moved our house to the back yard so we could dig a basement. In order to have this happen we needed to tear down our garage, AKA my workshop! I was sad, but SUPER excited to double the size of our house! 4 years later, we are loving our basement! It has made it possible for us to stay in our home. We now have baby #5 on the way, which would NOT have been possible without the basement.

I often think about craft nights and how much fun I use to have helping and visiting with my fellow crafters. I have SOOOOO many ideas that have been running in my mind, but I still don't have a workshop :(   My hubby and I are working on how to get things available to use again. I do not know how soon this will happen, but at least we are talking about it. I have begun to do some indoor crafting (non wood working) since I have this new big spacious basement! (I hope to share these items with you soon...until then, enjoy these exciting pictures of our CrAzY house move!)  I have tried to include pictures that are step by step of the move so there are quite a lot of them. This was such a fun, yet stressful event in our lives. I am so glad we did it and would not change a thing!


 I know I have pictures of the demolition of my workshop or at least I did. They were uploaded to another computer since I could not get into my home during the move...I just don't remember which computer or whose! I am not computer savvy so I need to see if my techy husband can figure it out for me. When they are found (hopefully) I will share them with you.


 Before & After:

 This picture isn't the best, I know, but it was all I could find. I need to organize my photos! They are chaotic. I am lucky I found this one.